
I have a secret weapon in my kitchen. It makes my daily bread taste amazing (and far more digestible than anything store-bought). As long as I take care of the starter, this weapon is an endless material. And the best part of all? It’s free for the taking. I’m talking about wild yeast — a faithful little organism that can be harnessed by anyone who takes time to get to know it.
Watch The Video
英语单词酵母来自古英语的“gist”和古高地德语的“jesen”,意思是发酵。这种微小的真菌很可能是第一个被驯化的生物,几个世纪以来,它被捕获并被用于为人类制作酒精饮料和面包。没有它,生活将会少很多快乐和更多的饥饿,这是肯定的!
Forming a relationship with wild yeast is a declaration of independence. Once you understand how to use your own locally captured wild yeast strains, you’ll never need to go to the store to buy yeast again, and you’ll have truly unforgettable bread and brews in exchange.
For the purpose of this article, I will be describing the means, method, and maintenance of a sourdough starter; the wild yeast that’s used to bake delicious bread. For those interested in catching wild yeast to make boozy concoctions, I cannot more heartily recommend Pascal Baudar’s bookThe Wildcrafting Brewer.
Where Is Wild Yeast Found?
Defining sources of wild yeast is a bit of a nonspecific endeavor when you think about it, because wild yeasts are everywhere. They form the bloomy layer onwild grapesand blueberries. They can be extracted from pine cones, flowers, or tree leaves. Your skin is even home to different types of yeast.
Wild yeast ubiquity is a confident assurance that you, too, will be able to capture it with ease. As long as you don’t live in an autoclave, you will have wild yeast in your environment. It’s there in your kitchen. You merely need to give it a nice place to colonize and thrive.
How To Capture Wild Yeast
I’m probably going to offend some purveyors of specific sourdough strains with this section, but I don’t mind. Come join me in a starter insurrection, and I’ll let you in on a little secret: A wild-yeast sourdough starter is so easy to capture, a child could do it with a jar, flour, and water.
Related Post:How To Make Sourdough
You don’t need to buy a kit from an online store. You don’t need to delve through endless threads on sourdough forums trying to hack the process with pineapple juice, organic grapes, or whey. You don’t need to attend some workshop to glean the carefully-guarded, month-long, secret process not available to the non-baking, ignorant hoi polloi. A sourdough starter is dead easy to make and maintain, and it is only a recent phenomenon that this knowledge has dropped out of our culture.
关于这个题目我读了很多书。烤面包是我的一项日常活动,我被印刷的过程描述得如此复杂而震惊。多年来,我自制了几十种开胃菜,这些开胃菜都做出了美味的面包。我相信,我精心制作的简单开胃菜对任何细心的人来说都是万无一不可的。
This is just one of many different methods for catching and using wild yeast, but it works for me as a busy homesteader, and it can work for you too.
Supplies
- 1-quart mason jars (2)
- Non-chlorinated water
- Whole wheat flour or whole rye flour
- Chopstick/non-metal utensil
- Rubber band
- Clean washcloth or double-folded section of cheesecloth big enough to cover the mason jar
- One week of time (or less depending on the weather)
基本的前提是我们要为野生酵母创造一个理想的生存环境,然后维持这个环境。如果你是发酵新手,这将是一个有点狂野的旅程,但坚持住,这是非常值得的。虽然一开始可能会有一些奇怪的气味,但最终的产品将会是愉快的香味,并会提高你的家庭烘焙酸面包。
Day One
In one of the mason jars, use a chopstick to thoroughly mix 1 cup whole grain flour of your choice with 1 cup of NON-CHLORINATED water. If you have city water, this means you can’t run water from your tap straight into the mason jar. The chemicals will kill the wild yeast in your starter.
The whole grains are also important. Though you can technically make a starter with white flour (I’ve never tried it), whole grain flour offers better results as it feeds the yeast more complete nutrition.
这种混合物应该有非常厚的煎饼面糊的稠度,你要在接下来的一周保持这种稠度。用一块布盖上混合物,用橡皮筋固定好,然后把罐子放在厨房里——不要让阳光直射,但要放在你能看到并不会忘记的地方。
Day Two
Compost half the water and flour mix, and then add ½ cup of water and ½ cup of flour, mixing thoroughly with the chopstick and adding more flour or water as needed to regain that pancake batter thickness. What you’ve just done is reduce the yeast population by half and provided food for the yeast that remains. This food is what they’ll use to grow in strength. Cover again.
Day Three
Depending on the ambient temperature of your kitchen, you may or may not start seeing little bubbles form in your starter when you stir it. There may also be a layer of clear liquid starting to form on the top.

Additionally, you may notice a rather unpleasant smell coming from the jar. If you notice these, take heart! Your starter is alive and beginning the process of becoming stable. Don’t worry, that smell is going to change for the better in a few days. And if you don’t see these signs yet, no worries. Starters develop more slowly in cooler temperatures, and there’s still time to get your wild yeast established.
Ason day two, reduce by half, feed, and cover.
Days Four Through Seven
继续减少一半,喂食如上。如果一切顺利,你会开始看到你的启动者在性格上的改变。泡沫将成为一个常见的景象,像碳酸奶昔一样渗透。清澈的液体也会成为正常现象。这是酵母的(含酒精的)废物。
Related Post:Bread Proofing
The volume of the batter in the jar will start to increase after feeding as the yeast produce hundreds of carbon dioxide bubbles (the power to raise bread has arrived). Finally, and most pleasantly, the smell of the jar is going to change dramatically. It will shift from that rotten cheese funk to something that smells downright pleasant like a nice, dark beer or wine.
Days Eight Through Forever
当罐子里的混合物变得活跃起来,气味很好闻,并且在喂食后改变了体积后,给自己一点鼓励:你有了酵母发酵剂,现在可以决定下一步要做什么了。如果你每天都烘焙,开胃菜就能在你的柜台上快乐地生活。
你会想要经常更换罐子,这样你就不会在罐子的开口周围有一堆硬皮的起动器(因此在供应清单中的第二个罐子)。现在你的发酵剂完全培养,你不再需要堆肥减少发酵剂材料。这是你用来烘焙的东西。

If you bake weekly, you can store the starter in a refrigerator to retard its activity when not in use. Take it out the night before you bake, then reduce and feed it enough that you’ll have plenty for breadmaking. After you bake, feed the starter again before putting it back in cool storage.
如果你不是每周都烤(也许你应该开始),确保你把发酵剂储存在冰箱里,继续减少,每周至少喂两次,以保持它的健康。
As long as you give your starter basic care and attention — keeping the jar clean, covering it, reducing and feeding at regular intervals, and of course, baking with it — you should have a happy symbiotic relationship for as long as you desire.
Troubleshooting And Common Problems
- Problem:Nasty surprise! The starter has maggots in it.
- Solution:Your starter is ruined. Start over, then cover the new starter with a thicker or more densely-woven cloth. Fruit flies love starter, and they’ll go to great lengths to get it.
- Problem:The starter is covered by a layer of clear or yellowish liquid.
- Solution:Your starter is just hungry. The liquid is a byproduct of fermentation, so pour off the layer, reduce by half, and feed.
- Problem:The starter is growing pink, green, blue, white, or black, fuzzy mold.
- Solution:Your starter is ruined. Under-maintenance allowed invading mold to overtake the weakened yeast. Start over, and put your starter someplace where you’ll remember to feed it daily.
- Problem:发酵剂被一层液体覆盖着一层奇怪的、白色的、像皮肤一样的薄膜。
- Solution:Your starter is REALLY hungry.Kahm yeast(what makes the film) is an indication that your starter needs to be fed ASAP. You may want to give your starter a recovery day before you bake with it again — just to get it back to full strength.
- Problem:The starter doesn’t seem to be very active.
- Solution:试着给发酵剂喂全黑麦粉(这是发酵剂的超级食物)或者每天喂一次以上。这个问题也可能是冬季气温较低的结果。试着把你的开胃菜放在冰箱温暖的顶部(只要你不忘记它)。
- Problem:Something else not listed here.
- Solution:请在下面的评论中告诉我!我很乐意尽我所能帮助你。
How To Use Your Wild Yeast Starter
当我开始我的酵母之旅时,我已经放弃从商店购买酵母五年了,我相信如果你愿意重新学习这种“旧的就是新的”的面包制作方法,你会发现在你的厨房里购买商店购买的酵母是不必要的。只用酵母发酵剂作为发酵剂,我就能做布朗尼、蛋糕、松饼、饼干、披萨面团、馕饼,以及各种各样的甜面包和咸面包。
The best way to get to know your sourdough is to bake with it often, and there’s no better reason to fire up the oven than to make a homemade loaf of real, whole grain sourdough bread. You can findmany, many recipes for making sourdough bread online, so I may as well offer our homestead’s super-simple recipe as well.

This is a straightforward bread recipe that I’ve developed over the years, and even though it only uses four ingredients, it produces a nourishing, delicious loaf that we make nearly every day.
Related Post:25种美味的酸面包食谱,为你的家庭入门
Since it doesn’t have an overnight ferment, the resulting loaf is hardly sour, and perfect for pretty much any use. It is 100% whole grain and won’t make the exact same lacquer-crust and a spongy interior that you may expect from a commercial bakery’s white sourdough, but you can’t beat the flavor and nutrition.
Watch The Video
Ingredients
- 8 ounces recently fed starter (basically 1 cup)
- 3 ½ cups whole wheat flour (increase to 4 cups if you grind your own) *
- Filtered water/non-chlorinated water (start with 1 cup — you’ll need more)
- 2 teaspoons salt
- Cornmeal for dusting baking surfaces
*注意:如果你有选择磨自己的面粉,我建议磨三份有机硬红冬小麦和一份有机黑麦谷物的组合。这是我们最喜欢的搭配,可以做出丰盛、美味、易于揉捏、口感极佳的面包。这也是一个很好的组合来满足你的开胃菜)。
Optional, But Helpful Equipment
- Cast-iron cloche
- Danish dough whisk
- Banneton with linen liner
- Pizza peel
- Baking stone
- Instant read thermometer
Directions
1. Remove Your Starter From The Fridge
The night before you bake, remove your starter from the fridge (if applicable), reduce, and feed twice as much as you usually do. I like to have at least 2 (or more) cups of starter available when I begin a baking day.
2. Add Flour To A Bowl And Slowly Mix In Water

Place the flour in a large bowl. Slowly mix in enough water to make the dough stick together without being sticky and wet. It’s okay if it looks crumbly. Allow to rest for 20 minutes.
3. Add Salt And Starter

Add salt and starter, and incorporate using your hand until the wet flour begins to merge with the starter. Once they are mixed well, allow to rest for 10 more minutes. Feed your starter in the meantime, and put it back in its place.
4. Knead The Dough

Wet your hands with water, and start to knead the dough in the bowl. Ideally, the dough should be pliable enough to work easily, but not so sticky and wet that it mushes and doesn’t hold its shape. Allow the dough to rest for five minutes.
Don’t be too frustrated if this stage is difficult for you. Learning the right consistency of dough during and after kneading is truly more art than science, and can be best learned through experience. Resist the urge to add too much flour. With whole grain, adding too much flour will result in a dense and crumbly, dry bread.
5. Continue Kneading Into A Round Ball

Knead for about 3 to 5 more minutes with a wet hand. By this point, the dough ball should be smooth. Cover and allow it to rise in a warm place for 2 to 3 hours.
6. Punch The Dough And Allow It To Rise

Gently punch down the dough mass, shape into a round boule (shaping tutorial here), and place in a banneton lined with flour-dusted linen. If you don’t have these traditional bread-raising baskets, a flour-dusted cloth napkin in a large mixing bowl can also work. Allow to rise again in a warm place for at least three hours.
7. Preheat The Oven And Prepare Your Baking Cloche And Stone
Preheat an oven to 450 degrees Fahrenheit. If you have a cast-iron cloche, preheat the empty cloche for 25 minutes as the oven heats. If you are using a cloche and also have a baking stone in your oven, make sure it is on a rack below the cloche, not in direct contact with it. If you are using a baking stone alone, place it on the second-lowest rack in your oven. If you don’t have these things, a cookie sheet is fine.
8. Dust The Cloche And Prepare The Loaf
小心地从烤箱中取出热钟罩,然后在钟罩底部撒上玉米粉,如果用的是披萨皮或烤盘,也可以撒上玉米粉。把面包放在玉米粉上,用锯齿刀切开顶部,以便在烤箱中膨胀。
Cover with cloche top (if applicable), slide onto a pizza peel (if applicable), and place in the oven for 25 minutes.
9. Reduce Heat And Check The Loaf
把火调到425度,去掉钟盖,再烤15到20分钟,或者烤到面包内部温度在190到200华氏度之间。敲击面包底部会发出一种空心的声音,这是检验烤熟程度的传统方法。
10. Allow Your Loaf To Cool And Enjoy!
Allow the loaf to cool on a drying rack for 10 minutes before slicing, and then enjoy with lots of butter and homemade preserves. It should last for around five days (wrapped in a cloth napkin) getting slightly more sour with every passing day — although our bread never lasts that long!
野生酵母还是商店买的?
When reading sourdough bread recipes online, you’ll often see that both professionals and home bakers combine the sourdough starter with store-bought yeast to make sure the process works. This is not only unnecessary; it may hamper the success of your bread. Wild yeast and store-bought yeast are different materials entirely.
Wild yeast is the common name forSaccharomyces exiguus, a naturally-occurring yeast that varies fascinatingly by region. The starter that you’re going to make for bread baking is technically a leaven which is a mixture of wild yeast and acid-producing, acid-tolerant bacteria.
Related Post:How To Make Irish Soda Bread
这两种微生物共同作用,发酵面团,产生二氧化碳气泡,使面包充气并提起,并提供独特的酸面团的味道。我喜欢天然酵母,因为它是特定的地方。我在欧扎克厨房里发酵的开胃菜会和你在你家做的不一样。你不可能在当地收获比这更多的了!

In contrast, store-bought yeast isSaccharomyces cerevisiae. It was originally a byproduct of the brewing industry but has been selectively bred in laboratories since the 1840s to shortcut the long fermentation process in favor of quick gas production. Commercial yeast doesn’t form a relationship with any bacteria which is why bread that’s made with it lacks that distinctive sourdough acidity.
The rapid rise provided by lab-refined yeast may get you a loaf in record time, but many of the minerals and nutrients in wheat will remain in a form that is relatively inaccessible to the human body. Without the acidification of being cultured from a long, fermenting rise, bread just won’t offer you the same food value.
When you understand this difference between the active, bubbling culture in your jar and the packet of dried, pale pellets that you get from the store, you’ll finally be on your way to trusting your starter to let it raise your bread, muffins, and biscuits on its own merit. It may take longer, but it’s worth it.
The Benefits Of Wild Yeast
The long fermentation process used to make sourdough products doesn’t just give it a complex flavor, it also does you the service ofpredigesting your food,making it far easier to benefit from the nutrition otherwise locked away in wheat.
There is considerable evidence that those with a sensitivity to gluten may benefit from long-fermented sourdough products. Though they may not be able to eat wheat products made with quick-rise yeasts, many gluten-sensitive individuals can eat organic, sourdough-leavened bakerywithout problems.
The health benefits notwithstanding, the difference in eating experience between a store-bought, chemical-laden loaf of bread and a crusty, wholegrain sourdough loaf are nothing short of extraordinary. After biting into a complexly flavorful, toothsome, bite of homemade bread, the flabby, featureless, store-bought stuff can seem downright insipid.
If you’re as absurdly passionate about real sourdough as I am, you’ll not have any trouble finding a daily use for your sourdough starter. If you start falling into the deep end of bread independence, you may even find yourself grinding and blending your own flour (it really makes a difference), geeking-out over excellent books likeThe Bread Buildersor anything byPeter Reinhart, and upping the consistency of your baking game by learningbaker’s percentages.I challenge you to give it a try. Reclaiming bread independence is a delightful, healthy, and delicious endeavor.
If you have any questions or need help troubleshooting problems with a starter or loaf of bread, let me know in the comments below!


Hi Wren,
I have been making my sourdough bread with Red Star Yeast. Thanks for the information about a better way. Can’t wait to begin.
顺便说一下,我对欧扎克有非常美好的回忆。45年前,我在阿肯色州欣德斯维尔附近有23英亩地。你在附近吗?在我购买这处房产的时候,我并没有意识到有人分享这段经历的重要性。我希望我仍然拥有这处房产,但我现在住在菲律宾,有一个可爱的妻子与我分享每一天。
Doug Patton
谢谢你的评论,Doug!在我烘焙面包的早期,我也把发酵剂和红星酵母混合在一起——一开始我真的不相信发酵剂。不过我可以保证它是有效的!我希望你的面包长得很好,我打赌菲律宾温暖的气候会让一些快速的文化!
Wow, you are such a concise informative writer Wren. I have been feeding a starter for a couple years now and keeping it in the fridge.. I don’t bake nearly enough because I keep doing the cold rise looking for that sourdough taste I love. The problem is, it’s so time consuming. Your recipe seems more accommodating and doesn’t take essentially 2-3 days to get a couple loaves of bread. Anyway always appreciate another take on it. Thanks.
你真是太好了,金!我希望这个食谱对你有用——如果你想要更酸的味道,就让它在一夜之间发酵,它仍然会有酸面团的味道。
WOW..Thanks….This is truly incredible..
Thanks, Jonathan! I hope you have some tasty baking success!
Hi Wren,
I am a bit confused as to why I need to use a wood stick to stir the water and flour together. I assume, at this point in the process, there are no chemical reactions going on that would interact with the metal and a stainless steel table knife would seem to make stirring easier. Can you fill me in as to exactly why I need to use a wood stick? Thanks
Hey, Doug! Thanks for your comment. Your assumption is correct–since sourdough is acidic, it has the potential to react with metallic substances. Even though the first mix of flour and water isn’t acidic, the starter will be, so it’s good to get into the habit for when you’ll be feeding the active culture a week down the road. Since the quality of stainless steel (what I assume many kitchen things are made of) varies so widely, some utensils may cause a reaction while others might be of higher quality and not. Using a wooden utensil just takes that unknown element out of the picture.
Of course, while I write this, I do it in the knowledge that my big bread mixing bowl is currently a stainless steel bowl (it was the biggest one I could find at the moment, and I’d rather have that then plastic). I try to protect the starter culture jar from potential weird reactions, but I don’t worry so much with the mixing bowls–the dough is only in there for a few hours.
I hope that clarifies things! And if you mix the first pre-starter batter with a table knife, I can’t imagine it would cause problems. Happy bread baking!
I started a wild yeast starter from white flour—am I now able to feed it any type flour to keep alive going forward? And will it change based on the type of flour fed to it?
You can feed a starter white, whole-wheat, or rye flour with excellent results. The more whole-grain the flour you use, the more vigorous the starter will become. Some bakers bake only with white flour, but still feed their starters rye flour because it is such good nutrition for the little guys! I imagine ground kamut , emmer, and einkorn could also work without a problem, but I haven’t messed around with those.
Do you know if this process will work with gluten-free flours? If so, is one flour or another better for it?
Gluten free flour blends are often made up with lots of different additives to mimic gluten, so I have no idea how they would respond when fermented. I did a quick google search and saw that King Arthur flours does have a gluten-free sourdough starter recipe, but I’ve never done it and so I can’t really offer advice on how to do it!
尽管如此,为了呼应文章中的观点,我还是要说,小麦粉(特别是有机小麦粉)的长时间发酵可以让那些对麸质敏感的人更容易消化小麦产品。显然,我不知道你的个人情况,但如果你愿意尝试,这可能是值得的!希望你能找到你想要的答案,莫莉,谢谢你的评论。
My starter is into its third day of fermentation, and seems to be healthy, but the clear liquid has sunk to the bottom. Is that a problem?
嘿,克莉丝汀。我发现,特别是在建立启动器的最初阶段,透明的液体会在罐子里到处流动。这也取决于你保持的发酵剂的粘稠度——它们可以是任何地方,从融化的奶昔的厚度一直到难以搅拌,但仍然有效(我个人更喜欢比煎饼面糊厚一点的)。真正的液体发酵剂可能会在罐子的不同位置“分离”。
Anyway, all that said–as long as you’re feeding it regularly, it’s bubbling, and there’ s no mold or acetone smell, you are good to go! Happy future baking!
I was eager to get started and did not have a mason jar, so I reused a cleaned out clear plastic protein powder jar. Do you think the plastic will cause any issues? Or should i just put this off until I get the glass jar?
Hey, Randy! Great question. You don’t specifically need a Mason Jar–any glass vessel will do (such as a cleaned-out mustard jar, or pickle jar, for example.) Mason Jars are just a really convenient size.
I wouldn’t recommend using plastic, though–the starter is acidic and will probably slowly but surely react with the material over time. The starter you have in there isn’t
“bad,” so no need to toss it–just transfer it to a ceramic/glass/nonmetallic vessel whenever you get one!
Hope that helps!
Greetings, I’m a screenwriter and I’m working on a story that involves an off the grid survivalist. I want to be authentic in describing his cooking/baking.
On Day 2 you say to “compost” part of the mixture. Do you mean tossing part out? Can’t I just divide it into two batches, so I always have some ready to go?
Thanks!
Hi Mike! Thanks for your question. Hopefully this lends some clarity.
这篇文章给出的第一个星期的指导是建立一个新的启动器——在这个过程中,有益和有用的细菌正在培养水/面粉的混合物,但这需要一些时间。堆肥/扔掉的一半混合物还不是开胃菜,而且闻起来也很难闻。几天的浪费对于细菌的正常培养是必要的。在这个过程中你必须减少它,否则你最后会得到一个和你的浴缸或其他东西一样大的启动器。
Once you have an ESTABLISHED starter, the part that you reduce from the mix is exactly what you use to bake. If you bake daily/every other day, you’ll never be composting or wasting flour–you’ll be using it in your daily bread, just like much of humanity used to do.
如果你真的想了解剧本的制作过程,最好的办法就是自己动手做!只需要几分钟的时间,你就可以直接观察这个过程。
Do you have a printable version of this yeast starter recipe, and other recipes detailing how to use it?
As a side note: I live in the Ozarks too.
Photo/Attachment: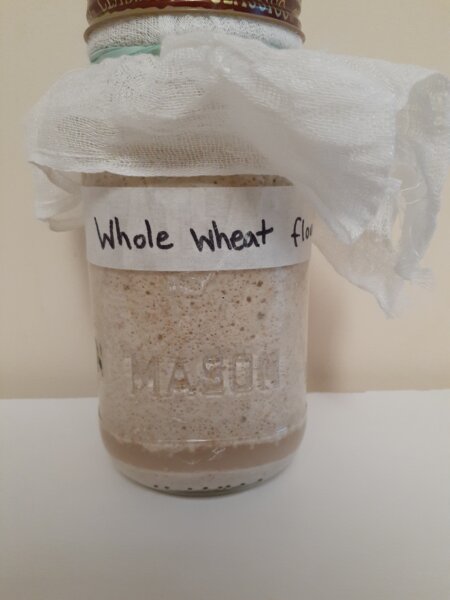

Hello, I’m on my second day with the starter and there’s clear liquid separating at the bottom. Should I stir it so the batter is mixed before I feed it of just feed it as is?
From my understanding, that’s waste product of the yeast, pour it out and do the reduce by half and feed it again.
What’s the percentage of starter to use for 100% flour? Eg: 1 kg of flour – how much starter to use?
Hi, I’m doing a starter and this instruction along with numerous others suggests letting your starter grow in a dark place. However, I’ve heard that the Yeast population grows in presence of UV light and have since put my jar next to the window (though there’s something to block it from fully direct sunlight) for that and additional warmth. It seems to be progressing well, though the funky cheese smell stage of the instruction doesn’t seem to go away as fast as the instruction indicates, is everything alright? (the yeast is consuming a lot, though, and some days I had to reduce and feed the yeast twice)